Inspect First: Dirty Evaporator Coil Signs for NY/NJ/CT Homeowners
The clearest signs of a dirty evaporator coil are weak cooling, rising energy bills, musty odors, ice or frost on the coil, and water leaking near the air handler. Heavy ice, a refrigerant smell, or an active leak means one thing: shut the system off and call a technician before running it again.
TL;DR:
- Coils become dirty primarily from fine airborne particles that stick and form biofilm, causing reduced heat transfer and airflow restriction.
- Symptoms like ice formation, musty odors, and water leaks indicate severe fouling and require immediate system shutdown before damage occurs.
- Regular maintenance, including filter upgrades and scheduled inspections, can significantly delay coil fouling and improve energy efficiency.
- DIY cleaning is limited to superficial dry vacuuming and no-rinse cleaners; deep cleaning and biofilm removal require professional servicing.
- Proper coil care can cut annual energy costs and prevent costly repairs, with professional cleanings costing a few hundred dollars depending on access and condition.
Table of Contents
- Recognizing Dirty Evaporator Coil Symptoms Starts With the Coil Itself
- How Coils Get Dirty: Causes and Timeline
- 1. Reduced Cooling Performance
- 2. Weak Airflow and Uneven Cooling
- 3. Higher Energy Bills and Longer Run Cycles
- 4. Musty or Moldy Odors When the System Runs
- 5. Ice or Frost on the Coil or Suction Line
- 6. Water Around the Indoor Unit or Drain Pan Overflow
- 7. Increased Dust and Poorer Indoor Air Quality
- 8. New Noises or Fan Strain
- Is It the Coil, or Something Else? A Quick Differential Checklist
- Immediate Actions and Safety Steps for Urgent Symptoms
- When to Call a Professional and What Coil Cleaning Costs
- Prevention: Cutting Fouling Time and Extending Intervals
- What a Reputable Coil Cleaning Visit Should Look Like
- The Practical Payoff of Routine Coil Care
- How Amazonairpro Handles Evaporator Coil Problems
- Sources
- FAQ
Recognizing Dirty Evaporator Coil Symptoms Starts With the Coil Itself
Your evaporator coil sits inside the air handler and pulls heat and moisture out of the air passing over it. Warm air crosses the cold coil, heat transfers into the refrigerant, and water condenses on the fins and drips into the drain pan. That process depends on clean metal and open airflow.
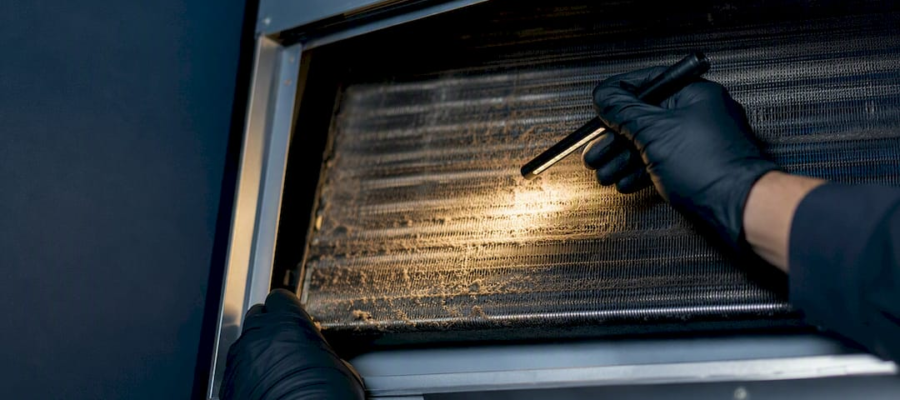
A dirty coil breaks both. Dust and grime coat the fins like a blanket, slowing heat transfer. Because the coil stays wet during operation, it becomes an ideal surface for biofilm growth, unlike the outdoor condenser coil, which dries out between cycles.
- Reduced heat transfer means the air leaving your vents isn’t as cold as it should be.
- Blocked fin passages restrict airflow, so your blower works harder for less output.
- A damp, dirty coil surface breeds mold and bacteria that circulate through your ductwork.
Every symptom covered below traces back to one of these two mechanical failures: heat transfer loss or airflow restriction.
How Coils Get Dirty: Causes and Timeline
Airborne particles between 1 and 10 microns, the ones your filter is least efficient at trapping, are the primary culprits. They stick to the naturally wet coil surface and combine with condensate to form a slow-building layer of grime and biofilm.
Filter quality changes everything about how fast this happens. A low-efficiency filter lets far more of that fine debris reach the coil, and a poorly sealed filter slot lets air bypass the filter entirely.
- Continuous-run systems, common in rental units and offices, foul faster than systems that cycle on and off.
- Homes with pets, smokers, or high humidity accelerate biofilm growth on the coil surface.
- Upgrading filter efficiency can multiply the time before fouling becomes significant by roughly seven times in modeled scenarios.
Under typical conditions, a residential coil accumulates enough debris to double its pressure drop in about 7.5 years, according to Lawrence Berkeley National Laboratory. That sounds slow until you realize most homeowners never clean the coil at all during that stretch, which means the fouling curve is already working against you by the time you notice a problem.
1. Reduced Cooling Performance
Your air conditioner runs, but the house never quite gets cold. This is the most common complaint tied to a fouled coil, and it happens because grime on the fins acts as insulation, blocking the heat transfer your system depends on. Less heat pulled from the air means warmer supply air at every vent.
2. Weak Airflow and Uneven Cooling
Some rooms feel fine while others stay warm, and the vents that used to blow strong now feel weak. A dirty coil raises air-side pressure drop, sometimes 40% to 100% above the clean design value, which chokes the volume of air your blower can push through the ductwork.

3. Higher Energy Bills and Longer Run Cycles
If your system runs longer to hit the same thermostat setting, you’re paying for that inefficiency every month. Fouled coils force the blower motor to work harder against the added resistance, and field measurements show fan energy penalties of 8% to 25% in severe cases. Combine longer runtimes with higher fan draw, and a summer electric bill can climb noticeably without any change in your habits.
4. Musty or Moldy Odors When the System Runs
A damp smell that shows up only when the AC kicks on almost always points to biological growth on the coil or in the drain pan. Microbial volatile organic compounds, the byproduct gases mold and bacteria release as they grow, are usually what you’re actually smelling. This symptom rarely resolves on its own and tends to get worse as the biofilm layer thickens.
5. Ice or Frost on the Coil or Suction Line
Frost forming on the coil, or on the copper suction line running to your outdoor unit, signals that airflow across the coil has dropped enough to let refrigerant temperatures fall below freezing. Pro Tip: If you see heavy frost, shut the system off immediately. Running a frozen coil can force liquid refrigerant back into the compressor, and that kind of damage is expensive to fix.

6. Water Around the Indoor Unit or Drain Pan Overflow
Puddles near your air handler usually mean one of two things: a clogged condensate drain or a coil producing more condensate than the drain line can handle. A dirty coil that struggles to dehumidify efficiently can dump water faster than usual, and biofilm buildup in the drain line makes clogs more likely.
7. Increased Dust and Poorer Indoor Air Quality
If you’re dusting more often or noticing a stale feeling in the air, a dirty coil could be recirculating trapped particles and biological material every time the blower runs. This is a slower, less dramatic symptom than a leak or a frozen coil, but it affects everyone breathing that air daily.
8. New Noises or Fan Strain
A blower motor working against a clogged coil often draws more current and can develop a subtle hum, rattle, or strain under load. This symptom is easy to dismiss, but it’s frequently the earliest audible warning before the more obvious signs appear.
Is It the Coil, or Something Else? A Quick Differential Checklist
Not every cooling complaint traces back to the coil. Before assuming the worst, work through a short list of cheaper, faster checks.
- Swap in a fresh air filter first. If cooling improves noticeably within a day, the old filter, not severe coil fouling, was likely the main culprit.
- An oily residue on refrigerant lines or a hissing sound near the unit points to a refrigerant leak, which requires a licensed technician, not a coil cleaning.
- If the blower sounds weak but the filter is clean, compare supply air temperature to return air temperature. A gap under 14 to 20 degrees Fahrenheit suggests a blower or duct problem rather than a coil issue.
- If weak cooling, odors, or ice persist after a filter change and these basic checks, a coil inspection is the next logical step.
Immediate Actions and Safety Steps for Urgent Symptoms
Some of the symptoms above call for action before you do anything else. Ice buildup, standing water, or a chemical refrigerant smell are not “wait and see” situations.
- Shut the system off if you notice heavy ice, pooling water, or a refrigerant odor. Continuing to run a frozen coil risks compressor damage that costs far more than a cleaning.
- Change the air filter and check the drain line for visible clogs. Use a bucket or towels to catch any leaking water and protect flooring underneath the unit.
- Never open refrigerant lines yourself, and never blast the coil with a garden hose or pressure washer. High-pressure water bends the thin aluminum fins, and refrigerant exposure is a genuine health hazard.
The payoff for acting on these symptoms is measurable. Research on coil cleaning documents fan energy savings of 8% to 20% and airflow increases up to 46% after a professional cleaning, depending on how fouled the coil was to begin with.
When to Call a Professional and What Coil Cleaning Costs
Some symptoms are DIY territory. Ice, persistent odors, visible biofilm on the coil, or anything suggesting a refrigerant leak are not.
- Call a professional if you see frost, smell mold every time the system runs, spot visible slime on the coil through an access panel, or simply can’t reach the air handler safely.
- A proper professional visit follows a set sequence: inspect the coil, dry clean it first with a vacuum and brush, then apply a no-rinse foaming cleaner, add antimicrobial treatment if biofilm is present, service the drain pan, comb any bent fins back into shape, and verify performance with delta-T and amperage readings.
- Residential evaporator coil cleaning generally runs in the low hundreds of dollars, with drain pan treatment and antimicrobial application often priced as add-ons. Exact pricing varies by system access, coil condition, and location across NY, NJ, and CT, so Amazonairpro’s evaporator coil cleaning page is the most reliable place to check current details for your area.
Prevention: Cutting Fouling Time and Extending Intervals
You can’t stop dust and moisture from meeting on the coil, but you can slow the buildup considerably.
- Upgrade your filter thoughtfully. Move toward a higher MERV rating without choking your blower. Check your system’s manual or ask a technician what your equipment can handle.
- Stick to a replacement schedule. Energy checking filters monthly during heavy-use seasons and replacing them roughly every one to three months.
- Run a seasonal checklist. Inspect the coil visually where you can, clear obstructed return vents, and confirm the condensate drain has proper slope and no clog at the trap. Learn more about how often coils should be cleaned based on your system’s runtime and filter grade.
- Consider UV lights or antimicrobial treatments if you have pets, a smoker in the household, or live in a coastal, high-humidity area of NY, NJ, or CT where biofilm forms faster.
Pro Tip: If your delta-T (the temperature difference between return and supply air) drops below 14 degrees, that’s a practical trigger to schedule cleaning regardless of how long it’s been since the last one.
What a Reputable Coil Cleaning Visit Should Look Like
A technician should never skip straight to spraying chemicals. The sequence matters: lockout and safety checks first, then dry cleaning with a vacuum and brush, followed by a no-rinse foaming cleaner and targeted antimicrobial treatment where biofilm is visible, drain pan disinfection, fin combing for any bent sections, and a final performance check.
Older homes across NY, NJ, and CT often have tighter air handler access and ductwork that traps more debris, and coastal humidity in parts of NJ and CT accelerates biofilm growth on the coil surface. Ask any technician for simple before-and-after numbers, like delta-T or airflow readings, as proof the service actually improved performance.
| What to Ask For | Why It Matters |
|---|---|
| Before/after delta-T reading | Confirms heat transfer actually improved |
| Drain pan inspection note | Prevents fast re-fouling within weeks |
| Visual coil photo | Documents fin condition and biofilm removal |
The Practical Payoff of Routine Coil Care
Most homeowners treat coil symptoms as an inconvenience rather than a warning. That’s backwards. A weak-cooling complaint today is a compressor repair bill waiting to happen if the coil keeps icing over every cooling season.
The math tends to favor prevention every time. A scheduled cleaning costs a fraction of an emergency service call, and it’s the difference between catching a $200 fix early and paying for a $2,000 one later. Connecting a symptom to its cause is what turns a vague complaint into a maintenance decision worth actually scheduling.
— Victor
How Amazonairpro Handles Evaporator Coil Problems
Amazonairpro is the direct local option for homeowners across NY, NJ, and CT who’d rather book a real cleaning than guess at DIY fixes that risk bent fins or refrigerant exposure. Our evaporator coil and blower cleaning service covers the full sequence: dry cleaning, drain pan disinfection, and optional antimicrobial or deodorizing treatment for coils showing biofilm or odor.

Before a technician arrives, clear access to your air handler and note any symptoms you’ve noticed, whether that’s ice, odd smells, or water near the unit. That helps our team diagnose faster and confirm whether the fix is coil cleaning, a condenser coil cleaning, or a broader air duct cleaning visit. Request a quote through our evaporator coil cleaning page and get a technician scheduled before a minor symptom turns into an emergency repair.
Sources
- Purdue IRACC paper on coil fouling and energy impacts
- Lawrence Berkeley National Laboratory analysis of residential coil fouling
- TheHVACLab on AHU evaporator coil biofouling and energy
- NADCA guidance on coil cleaning best practices
- Energy
FAQ
Can You Clean an Evaporator Coil Without Removing It?
Yes, most residential coils can be cleaned in place using a dry vacuum and brush followed by a no-rinse foaming cleaner that flushes into the condensate drain. Removal is only necessary for severe fouling, physical damage, or very limited access to the air handler.
What Does Evaporator Coil Cleaning Typically Cost?
Residential coil cleaning generally falls in the low hundreds of dollars, with drain pan treatment and antimicrobial application often priced separately. Amazonairpro doesn’t publish a fixed rate online, so check current pricing on the evaporator coil cleaning page for your specific situation.
How Often Should AC Evaporator Coils Be Cleaned?
Most residential coils benefit from a professional check every one to two years, though homes with pets, smokers, or continuous-run systems may need it more often. A practical trigger is a delta-T reading that drops below 14 degrees, which signals it’s time regardless of the calendar.
What Is the Average Lifespan of an AC Evaporator Coil?
A well-maintained evaporator coil typically lasts 10 to 15 years, though neglected coils that run fouled for years can fail earlier due to added strain on the compressor. Routine cleaning and filter changes are the main lever homeowners have over how long a coil actually lasts.
Recommended
- 6 Signs Your Condenser Coil Is Dirty: NY/NJ/CT Tech Checklist
- NY/NJ/CT Homeowners: Clean Coils When Delta T Falls or Pressure Rises
- Stamford CT Evaporator Coil Cleaning | Lower Your Eversource Bill
- Norwalk CT Evaporator Coil Cleaning | Older Homes, Coastal Humidity