How to Prepare Your HVAC for Spring: A Homeowner’s Guide
Spring HVAC maintenance comes down to four tasks you can start today: replace the air filter, clear debris from the outdoor condenser, run a short cool-mode test, and check the condensate drain. Do these in March or April and you avoid the May–June service backlog that pushes technician lead times to two weeks or more, while demand-based pricing climbs.
Your immediate spring checklist:
- Replace or inspect the air filter. Hold it up to a light source. If you cannot see light through it, swap it out.
- Clear the outdoor condenser. Remove the winter cover, cut back any vegetation to at least 2 feet on all sides, and pull out leaves or debris from the top grille.
- Run a cool-mode test on a mild day. Set the thermostat 5°F below the current indoor temperature and confirm the system starts within 3–5 minutes.
- Check the condensate drain. Pour a cup of water into the drain pan and confirm it flows freely. If it pools, the line needs flushing.
Safety first, always: Before touching any component beyond the thermostat, cut power at the outdoor disconnect switch and at the main breaker. Never skip this step.
Key Takeaways
Spring HVAC preparation in March or April protects your system’s efficiency, prevents emergency repairs, and secures technician availability before summer demand drives up both wait times and pricing.
| Point | Details |
|---|---|
| Act in March–April | Booking early avoids two-week lead times and demand-based pricing that arrive with May–June heat. |
| Four immediate DIY tasks | Replace the filter, clear the condenser, flush the condensate drain, and run a 10–15 minute cool-mode test. |
| DIY safety boundary | Always cut power at the outdoor disconnect and main breaker before opening any panel or touching any component. |
| Efficiency gains are real | Basic homeowner cleaning delivers a 5–15% efficiency boost; professional coil and blower service achieves larger, verified gains. |
| Amazonairpro covers NY, NJ, CT | The team handles duct, coil, and blower cleaning together for complete air-path results — book a spring visit before the season peaks. |
Table of Contents
- How to prepare your HVAC for spring, starting with the outdoor condenser
- What you can safely do indoors: filters, vents, and the air handler
- How to flush the condensate drain and care for your evaporator coil
- How to test your thermostat and run a quick system check
- Safety rules and when to call a licensed technician
- Why scheduling HVAC service in early spring actually saves you money
- Your printable spring HVAC checklist
- A local perspective on spring HVAC prep in NY, NJ, and CT
- Amazonairpro serves NY, NJ, and CT homeowners ready for a professional spring tune-up
- Sources
- FAQ
How to prepare your HVAC for spring, starting with the outdoor condenser
The outdoor condenser unit takes the most punishment over winter. Leaves, seed pods, and compacted debris restrict airflow and force the compressor to work harder the moment you call for cooling. A careful inspection and light cleaning before the first hot day is one of the most direct ways to protect your equipment.
Before you touch anything, cut power at two points: the outdoor disconnect box (usually mounted on the wall near the unit) and the main breaker. Confirm the unit is fully off before proceeding.
What to inspect and do:
- Remove the winter cover if you used one, and check for any animals or nests that may have moved in.
- Clear all vegetation to a minimum 2-foot clearance on every side and above the unit.
- Look at the refrigerant lines running into the house. The insulation (foam or rubber wrap) should be intact with no cracks or gaps.
- Examine the aluminum fins on the sides of the unit. Bent fins block airflow. A fin comb, available at most hardware stores, straightens them safely.
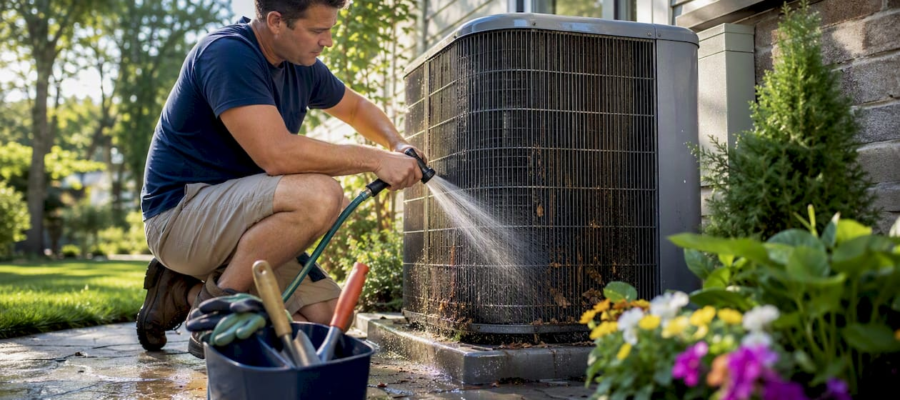
- Remove the top grille carefully (usually 4–6 screws). Rinse the coil from the inside out using a garden hose on a gentle setting. This pushes debris out rather than deeper into the coil. Never use a pressure washer; the force bends fins and can damage the coil surface.
- Replace the grille before restoring power.
Tools to have ready: work gloves, safety glasses, a fin comb, a garden hose with a gentle-spray nozzle, and a flashlight.
What to never do: open refrigerant lines, attempt to recharge refrigerant yourself, or run the unit with the top grille removed. Refrigerant handling is EPA-regulated and requires a licensed technician.
Pro Tip: Listen closely during the first startup of the season. A healthy condenser hums steadily. A clicking or buzzing sound without the compressor engaging often points to a failing capacitor or contactor, both of which a technician can replace quickly and affordably if caught early.
Statistic: About 1/16 inch of dust on blower blades can reduce airflow by up to 30%, which means the same principle applies outdoors: even a thin layer of debris on condenser fins measurably degrades performance.
What you can safely do indoors: filters, vents, and the air handler
Indoor maintenance is where most homeowners can make the biggest immediate difference. The steps below are safe for any homeowner to complete without special tools or training.
- Check and replace the air filter. Pull the filter from the return-air grille or air-handler cabinet. Hold it up to a window or lamp. If light does not pass through clearly, replace it. For homes with pets or allergy sufferers, check monthly. For standard households, every 60–90 days is a reasonable baseline.
- Remove and clean return grilles and supply registers. Unscrew each grille, vacuum the blades with a brush attachment, and wipe with a damp cloth. While the grille is off, shine a flashlight into the duct opening and check that the damper blade (if present) is open and not stuck.
- Inspect the air-handler cabinet. Cut power at the breaker first. Open the access panel and use a vacuum with a brush attachment to remove loose dust from the cabinet interior. Wipe the inside walls with a dry cloth. Look for standing water in the drain pan, oil stains on any surface, or any wiring that appears discolored or melted.
- Check the blower wheel if accessible. A thin layer of dust on the blades, roughly 1/16 inch, can cut airflow by up to 30% and puts extra strain on the motor. If you can see the wheel through the access panel, vacuum it gently. If it wobbles or you hear a grinding noise, stop and call a technician.
- Stop and call a pro if you see: visible mold growth inside the cabinet, oil leaks on or near the motor, a blower wheel that wobbles or scrapes, or any burning smell when the system runs.
Light homeowner cleaning and filter replacement can improve system efficiency by roughly 5–15%. Professional air-handler service, which goes deeper into coil and blower cleaning, commonly runs $80–$250 and delivers larger, verified gains. For a deeper look at year-round indoor air tasks, the seasonal indoor air maintenance guide covers schedules and frequency in detail.
How to flush the condensate drain and care for your evaporator coil
The condensate drain line carries moisture pulled from your indoor air to a floor drain or outside. When it clogs, water backs up into the drain pan and can overflow onto ceilings or floors. Flushing it once a year in spring takes about 15 minutes and prevents a genuinely expensive problem.
How to flush the primary drain line:
- Cut power at the breaker before opening any access panel.
- Locate the PVC condensate drain line, usually a 3/4-inch white pipe exiting the air-handler cabinet.
- Find the clean-out cap or T-fitting near the air handler. Pour one cup of plain white vinegar into the line. Let it sit for 30 minutes to break down algae and light buildup.
- At the termination point (outside or at a floor drain), use a wet/dry vacuum to pull any remaining debris out from the end of the line.
- Pour a cup of water into the drain pan and watch it drain. If it pools, the line is still partially blocked and needs professional attention.
Test the float switch. Most modern air handlers have a float switch in the drain pan that shuts the system off if water rises too high. Pour water slowly into the pan until the float rises. The system should cut off. If it does not, the switch may be stuck or faulty.
Signs of a clogged or failing drain: water dripping from the secondary drain line (the one that exits near a window or soffit), wet spots on the ceiling below the air handler, or a musty smell near the unit.
Evaporator coils accumulate a sticky biofilm from dust and moisture that can reduce cooling efficiency by 20–40% and may require professional cleaning to avoid corrosion and warranty issues. Homeowners can apply a light no-rinse coil spray to accessible coils with light surface dust, but heavy buildup, biofilm, or any sign of mold should go to a licensed technician.
What homeowners should never do: open refrigerant lines, use high-pressure chemicals on coils, or attempt a refrigerant recharge. These tasks are EPA-regulated and carry real risk of equipment damage and personal injury.
Pro Tip: If your secondary drain line is dripping, your primary line is already clogged. Shut the system off immediately and flush the primary line before running the system again. Running it with a blocked primary drain will fill the pan and overflow.

How to test your thermostat and run a quick system check
Testing your cooling system on a mild day is one of the most practical things you can do before summer arrives. A problem that shows up on a 65°F afternoon in April is far less stressful than one that surfaces on a 95°F day in July with a two-week wait for a technician.
Step-by-step system test:
- Set the thermostat to “Cool” mode and dial the temperature 5°F below the current indoor reading.
- Wait up to 5 minutes. You should hear the outdoor unit start (compressor hum plus the condenser fan spinning) and feel cool air at the supply registers within a few minutes of startup.
- Switch the fan to “On” (not “Auto”) and walk to each supply register. Airflow should be consistent. A register with noticeably weak flow may have a closed damper, a blocked duct, or a dirty filter.
- Return the fan to “Auto” and let the system run for 10–15 minutes. Check that the indoor temperature is actually dropping.
What common symptoms mean during the test:
- Humming but no startup: often a failed capacitor or contactor. Book a technician.
- Weak airflow at all registers: check the filter first; if clean, suspect the blower wheel.
- Unusual odors (musty or burning): musty suggests mold in the ducts or coil; burning suggests an electrical issue. Both warrant a pro call.
- Short cycling (starts and stops every few minutes): could be a refrigerant issue, a dirty coil, or a thermostat problem.
Programmable and smart thermostats are an Energy.gov-recommended energy-saving measure. If your thermostat is more than 10 years old or you are still using a manual dial model, spring is a practical time to upgrade. A basic programmable model costs $25–$50 and can meaningfully reduce your cooling bill when set correctly.
Safety rules and when to call a licensed technician
Clear DIY limits protect both you and your equipment. The core rule is simple: cut power at the thermostat first, then at the breaker, before opening any panel or touching any component. Wear work gloves and safety glasses whenever you work near the outdoor unit or inside the air-handler cabinet.
Red flags that require a pro call, not a DIY fix:
- A fuel or burning smell when the system runs
- Grinding or metallic scraping sounds from the blower or outdoor unit
- Visible oil stains near the compressor or refrigerant lines
- Ice forming on the refrigerant lines or evaporator coil
- Frequent short-cycling (the unit starts and stops every few minutes)
- Any refrigerant leak (a hissing sound or oily residue near line connections)
A professional spring tune-up covers tasks that go well beyond what a homeowner can safely do: checking refrigerant levels (EPA-regulated), tightening electrical connections, testing capacitors and contactors, verifying airflow and static pressure, cleaning coils with professional-grade solutions, and calibrating the thermostat. A standard tune-up visit runs 60–90 minutes.
Booking in March or April means shorter wait times and standard pricing. Waiting until May or June commonly results in two-week lead times and higher demand-based rates, which can increase costs. For a broader view of what to expect from a professional visit, the HVAC system maintenance overview walks through the full process.
Why scheduling HVAC service in early spring actually saves you money
The case for March–April maintenance is not just about convenience. It is about cost, reliability, and catching problems before they become emergencies.

Scheduling advantage: Technicians recommend completing spring maintenance in March or April. By May, demand spikes and appointment slots fill quickly, often pushing lead times to two weeks or more. Homeowners who book early get standard pricing and their choice of appointment times.
Energy savings: Light homeowner cleaning and filter replacement can boost system efficiency by roughly 5–15%, while professional cleaning and tuning delivers larger, verified gains. Over a full cooling season in a New York or New Jersey home, that difference shows up on your utility bill.
Reliability: Capacitors and contactors degrade gradually. A technician who catches a weak capacitor in April replaces it for $50–$150. The same failed capacitor in July, on a 90°F day, means an emergency call, a premium rate, and potentially a compressor that overheated waiting for the repair. Testing on a mild day reveals these latent issues before they become urgent.
Duct cleaning alone misses evaporator coil and blower wheel problems. A complete air-path cleaning that covers ducts, coil, and blower wheel delivers measurably better indoor air quality and sustained performance gains. This is worth keeping in mind when comparing service options.
For homeowners who want to go deeper on long-term care, the guide on proven ways to extend HVAC life covers replacement signals and maintenance intervals that protect your investment year over year.
Your printable spring HVAC checklist
Use this as your reference before and during the season. The full seasonal HVAC maintenance checklist covers all four seasons in detail.
Do now (March–April):
- Replace or inspect the air filter
- Clear debris and vegetation from the outdoor condenser (2-foot clearance minimum)
- Rinse condenser coil from inside out with a garden hose (low pressure)
- Straighten bent fins with a fin comb
- Flush condensate drain with white vinegar; test float switch
- Wipe and vacuum return grilles and supply registers
- Run a 10–15 minute cool-mode system test
- Schedule a professional tune-up if not done in the past 12 months
Monthly (May through September):
- Check the air filter; replace if light does not pass through clearly
- Confirm 2-foot clearance around the outdoor unit remains clear
Annually (each spring):
- Professional tune-up: refrigerant check, electrical tightening, coil cleaning, capacitor/contactor inspection
- Condensate drain flush and float switch test
- Blower wheel inspection (pro or DIY if accessible)
Every 2–3 years or as needed:
- Deep evaporator coil and blower cleaning by a licensed technician
- Full duct inspection and cleaning if dust, mold, or IAQ concerns are present
Tools and supplies to keep on hand: replacement filters in the correct size, a garden hose with a gentle-spray nozzle, a wet/dry shop vacuum, a fin comb, a flashlight, work gloves, and safety glasses.
A local perspective on spring HVAC prep in NY, NJ, and CT
Homeowners in New York, New Jersey, and Connecticut face a specific seasonal rhythm that makes early spring prep more consequential than it might seem. Winters here are genuinely hard on HVAC equipment. Outdoor units sit through freeze-thaw cycles, heavy precipitation, and months of inactivity. By the time April arrives, a condenser that looks fine from the outside may have bent fins, debris packed into the coil, or a capacitor that is one hot startup away from failing.
The pattern Amazonairpro sees repeatedly across the NY/NJ/CT service area is homeowners who wait until the first genuinely hot day to discover their system is not working. At that point, every HVAC technician in the region is booked. The repair that would have cost $150 in April now carries an emergency premium and a week-long wait. Duct cleaning alone does not address coil or blower wheel problems, which is why Amazonairpro’s approach combines duct cleaning with evaporator coil and blower cleaning for complete air-path performance.
Spring prep is not about being cautious. It is about being practical with your time and money before the season demands it.
Amazonairpro serves NY, NJ, and CT homeowners ready for a professional spring tune-up
If you have worked through the DIY checklist and want a professional to handle the rest, Amazonairpro covers New York, New Jersey, and Connecticut with a focused set of spring services: professional air duct and HVAC cleaning, evaporator coil and blower cleaning, condenser coil cleaning, condensate drain service, and antimicrobial duct treatment. The team has over 10 years of experience with both residential and commercial systems.

What sets a booked visit apart from a basic tune-up elsewhere is the complete air-path approach: ducts, coil, and blower cleaned together rather than in isolation. You receive a full inspection with photos and a clear summary of what was found before any work begins. No guesswork, no surprise add-ons.
To schedule your spring service or request an estimate, visit Amazonairpro or call the team directly. Booking in March or April means you get your preferred date and standard pricing before the summer rush begins.
Sources
- HVAC spring maintenance checklist: get your system ready before summer | ServiceMag
- Spring HVAC maintenance checklist for homes | Ranck Inc.
- Spring HVAC tune-up checklist | B&H Heating and Air
- Why duct cleaning alone isn’t enough | Breezy Air
- What is an evaporator coil? | Trane
FAQ
Do I need to do anything to my AC unit in spring?
Yes. At minimum, replace the air filter, clear debris from the outdoor condenser, flush the condensate drain, and run a short cool-mode test. If the system has not had a professional tune-up in the past 12 months, schedule one before summer.
What is the best time to schedule spring HVAC maintenance?
March or April is the recommended window. Waiting until May or June commonly results in two-week lead times and higher demand-based pricing as technicians fill up with emergency calls.
Does putting a cover or umbrella over an AC unit help?
A winter cover protects the unit from falling debris and ice during the off-season, but you should remove it completely before running the system. Operating the unit with any cover in place blocks airflow, overheats the compressor, and can cause serious damage.
What does a professional HVAC tune-up actually include?
A standard professional tune-up covers refrigerant level verification, electrical connection tightening, capacitor and contactor inspection, coil cleaning, thermostat calibration, and an airflow check. The visit typically runs 60–90 minutes.

How much can basic spring maintenance improve my system’s efficiency?
Light homeowner cleaning and filter replacement can improve efficiency by roughly 5–15%. Professional coil and blower cleaning delivers larger gains, particularly when evaporator coil biofilm has built up over one or more seasons.
Recommended
- Seasonal HVAC Maintenance Checklist for Homeowners
- Seasonal Indoor Air Maintenance Tasks: Your Year-Round Guide – Amazon Air Duct Cleaning
- Get Your Furnace Ready Before Winter Hits the Northeast
- First-Time Homeowner? Your Year-One HVAC Checklist