Dryer Vent Clogs: Why Roof Vents Need a Pro in NY, NJ & CT
If your dryer exhausts through the roof, the most common problem is condensation-driven lint buildup that quickly restricts airflow. Warm, moist air cools as it rises through a long vertical duct, and the moisture turns loose lint into a sticky mass that clings to the duct walls. Inspect and clean the vent as soon as you notice slow drying, and call a professional right away if you smell burning or see smoke.
TL;DR:
- Clean the vent at least once a year, and schedule service more often for long roof runs, heavy laundry use, or nesting.
- Handle lint screens and accessible transition ducts yourself, but leave roof cap cleaning to technicians equipped for safe access and rotary tools.
- Use rigid metal ducting, remove interior screws that catch lint, and consider a booster fan when equivalent duct length exceeds 35 feet.
- Choose a roof cap with a working backdraft damper and proper flashing, and avoid screens or grilles that collect lint and restrict airflow.
Table of Contents
- Common Signs and Causes of Roof Dryer Vent Problems
- Why Roof-Vented Dryers Fail More Than Wall Vents
- How to Inspect and Diagnose a Roof Dryer Vent
- Cleaning Frequency and Maintenance That Actually Works
- Practical Fixes and Upgrades for Roof-Vented Dryers
- Safety and Code Basics Every Homeowner Should Know
- Why Roof Dryer Vents Deserve a Second Look From a Professional
- Get Your Roof Dryer Vent Cleaned the Right Way
- FAQ
- Sources
Common Signs and Causes of Roof Dryer Vent Problems
A roof-vented dryer that is struggling usually tells you before it fails outright. Watch for these symptoms:
- Drying cycles that take noticeably longer than they used to, sometimes requiring two or three runs for one load.
- Clothes that come out hot to the touch but still damp at the end of a cycle.
- A burning or musty smell coming from the dryer or laundry area.
- Visible lint, moisture stains, or nesting material around the roof cap.
- A dryer that feels hot on the outside or shuts off mid-cycle.
The root causes behind these signs are fairly consistent. Lint accumulates naturally in any vent, but condensation in long vertical runs turns that lint into a sticky residue that is much harder to dislodge than dry lint in a short horizontal duct. Kinked or sagging duct sections, flexible plastic or foil ducting instead of rigid metal, and undersized roof terminals all make the problem worse. As airflow drops, the dryer’s motor and heating element work harder, which raises internal temperatures and increases wear on the machine over time.
Why Roof-Vented Dryers Fail More Than Wall Vents
A dryer vented through a side wall usually has a short, mostly horizontal path to the outside. A roof-vented system is a different animal. Warm, moist exhaust has to travel upward through a longer duct run, and as that air climbs and cools, moisture condenses on the interior duct walls. That dampness makes lint stick rather than blow through, so buildup happens faster and in places you cannot easily see.

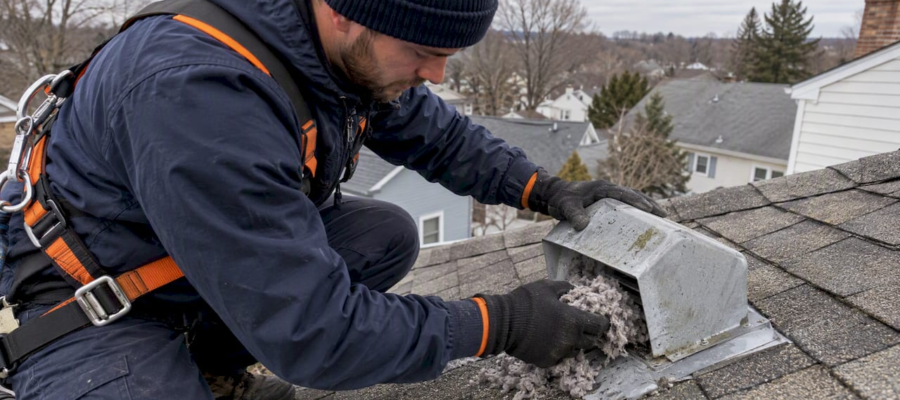
Roof terminals are also harder to reach. Cleaning a wall vent cap takes a few minutes with a ladder. A roof cap often means a safe roof walk, fall protection, and specialized tools, so homeowners tend to put off service longer than they should. Building layout and code placement rules sometimes force a longer, upward run when a shorter wall path isn’t available, which compounds the condensation issue from the start.
How to Inspect and Diagnose a Roof Dryer Vent
Before touching anything, unplug an electric dryer or shut off the gas supply to a gas dryer. Stop using the machine immediately if you detect a burning smell. Then work through these checks:
- Clean the lint screen and check the flexible transition duct behind the dryer for kinks, excessive length, or cracked foil.
- Run the dryer for a few minutes and feel for airflow at the machine’s exhaust connection; weak or absent airflow points to a blockage further down the line.
- Compare current drying time with how the dryer performed when new.
- From the ground, use binoculars to check whether the roof cap’s damper opens and closes, and look for lint, staining, or nesting material around it.
Pro Tip: Never climb onto the roof yourself to inspect or clear a dryer vent cap; a professional with the right harness and ladder setup can do it safely in far less time.
If you find solidified, wet lint, damaged ducting, a persistent burning odor, or any concern around a gas connection, stop troubleshooting and check for the warning signs that call for professional attention rather than a DIY fix.
Cleaning Frequency and Maintenance That Actually Works
Most manufacturers and service guides recommend cleaning a dryer vent at least once a year. Roof-vented systems, long runs, heavy laundry use, or any sign of animal nesting all call for more frequent attention, and checking your cleaning schedule against your own usage patterns is a smart habit.
There’s plenty you can safely handle yourself:
- Clean the lint screen after every load, not just when it looks full.
- Vacuum the flexible transition duct behind the dryer every few months.
- Use a vent brush kit on short, accessible duct sections, but stop there. Do not climb onto the roof to clean the cap yourself.
Professional service goes further. Technicians use rotary-powered brushes and negative-pressure vacuum systems to break up and remove wet, adherent lint that a brush-only kit often cannot clear from a long vertical run. They also inspect for improper materials, check that joints are sealed, and replace damaged transition ducts with rigid metal when needed.
Pro Tip: A protruding screw where sections of duct meet is one of the most common snag points for lint; it’s a small detail that causes outsized buildup over time.

Avoid leaving plastic or foil ducting in place, and skip adding a screen or cage at the vent opening. Screens feel like a good idea but trap lint and accelerate the exact blockage you’re trying to prevent.
Practical Fixes and Upgrades for Roof-Vented Dryers
When a roof run keeps causing trouble, a few concrete upgrades make a real difference:
- Rerouting to a shorter, more horizontal path reduces condensation and is the preferred fix whenever the layout allows it.
- A booster or in-line fan helps maintain airflow on long runs, though it adds a component that needs its own maintenance and inspection to keep working correctly.
- Replacing plastic or foil ducting with rigid or semi-rigid smooth metal, and removing any interior screws that catch lint, cuts down on buildup significantly.
- Choosing a roof termination built for serviceability, with a weatherproof cap that allows easy access for cleaning, beats a sealed or hard-to-reach design every time.
Before installing a booster fan, it’s worth confirming your duct length against the 35-foot guideline that determines when one becomes necessary.
Safety and Code Basics Every Homeowner Should Know
The International Residential Code sets the baseline most installers follow: dryer exhaust ducts should use rigid metal construction, connections should rely on UL-listed transition materials, and the duct should never terminate into an attic or crawlspace. A commonly cited practical limit is 35 feet of equivalent duct length before airflow performance drops and a booster fan becomes worth considering.
Avoid any cap design with a screen or grille, since both trap lint at the exact point where airflow needs to be clearest. Roof terminations should include a working backdraft damper and proper flashing to keep water out.
Lint buildup and failure to clean dryer vents are leading contributors to residential dryer fires, which is the main reason fire-safety guidance treats annual cleaning as a non-negotiable habit rather than a nice-to-have. Government energy guidance backs the same material and installation rules, and federal fire safety reporting reinforces that exhaust must terminate outdoors and be inspected on a regular schedule.
Why Roof Dryer Vents Deserve a Second Look From a Professional
Roof-vented dryers hide their problems well. A wall vent shows you lint buildup at eye level. A roof terminal lets wet, compacted lint accumulate out of sight for months, which is exactly why fire-safety data ties uncleaned vents to a large share of residential dryer fires. Trained technicians handle roof access safely and bring rotary cleaning tools built for stuck, wet lint that a homeowner’s brush kit simply can’t match.
Before a service visit, clear a path to your dryer and note how long cycles have been taking. A technician will check duct material, measure run length, and assess whether a booster fan or rerouting makes sense for your setup, along with the roof flashing and penetration points that affect long-term vent performance.
— Victor
Get Your Roof Dryer Vent Cleaned the Right Way
Roof-mounted dryer vents need safe access, the right tools, and an eye for the small installation mistakes that cause big problems later. Our technicians bring rotary-powered cleaning equipment and negative-pressure vacuum systems built to clear wet, compacted lint from long vertical runs, along with a full inspection of your ducting material and roof termination.

If it’s been a year or more since your vent was serviced, or you’re already seeing the warning signs, book a dryer vent cleaning with our team across New York, New Jersey, and Connecticut.
FAQ
Should you run a dryer vent through the roof?
A roof-terminated dryer vent is allowed under most building codes, but it tends to require more upkeep than a wall vent because the longer vertical run promotes condensation and sticky lint buildup. A shorter, horizontal wall vent is generally easier to maintain when your layout allows for one.
My roof dryer vent is clogged. How can I clean it?
Start by cleaning the lint screen and checking the transition duct behind the dryer for kinks or buildup. Because roof access is involved, clearing the cap itself is best left to a professional with the right rotary cleaning tools and safety equipment rather than climbing up yourself.
What are some common problems with roof vents?
The most frequent issues are lint accumulation made worse by condensation, kinked or sagging ducting, improper plastic or foil materials instead of rigid metal, and blocked or poorly designed roof terminals. Animal nesting at the roof cap is another common culprit behind restricted airflow.
How often should a roof dryer vent be cleaned?
Most guidance recommends cleaning a dryer vent at least once a year, with more frequent service for long roof runs or heavy household laundry use. Homes noticing longer drying times or a burning smell should schedule cleaning sooner rather than waiting for the annual mark.
Sources
- Proper Clothes Dryer Venting | Building America Solution Center
- Energy
- Home dryer fires | NFPA Research
- Topical Fire Report Series: Clothes dryer fires in residential buildings (USFA/FEMA)
Recommended
- Dryer Vent & Air Duct Services in NJ & NY | Book Today
- Stop Dryer Vent Moisture Before Mold or Fire, NY/NJ/CT Homeowners
- Dryer Vent Blockage Removal: Safety-First Steps for Homeowners
- Clogged Dryer Vent Symptoms: What Homeowners Must Check